Many of you have asked me for advice on creating jewelry using resin and bees. I have been using resin to create one of a kind jewelry for the past few years now and have more than a few tips to share. You can find detailed instructions below on how I do it and some things to consider. Enjoy!
How to Make Resin Jewelry with Your Bees
Materials You Will Need:
- A few dead bees, preferable ones that are not super old and brittle.
- Some small dried flowers or decorative elements such as paper, glitter etc.
- Non-toxic Epoxy Resin- such as ArtResin brand. AeroMarine also has an excellent epoxy.
- Silicone or plastic resin casting molds- Amazon has a large variety of shapes and prices
- A small clear plastic cup to mix the resin in and a wooden stir stick.
- Tweezers
- Scissors
- Poker or Needle
- Latex Gloves
- Old Newspaper
- Paper Towels


INSTRUCTIONS:
Preparation:
- Prepare your space by laying down newspaper to protect any surfaces you are working on. Resin can permanently damage your table and every time you see that shiny blob on your table you will be reminded of your haste and feel embarrassed- trust me I know.
- Gather all of your materials and tools needed and have them accessible. Once you mix the resin time is of the essence!
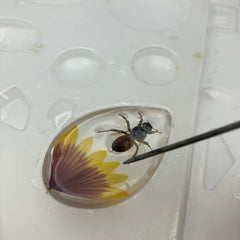
- Decide what casting mold you will use for your piece and stage the bee along with decorative items inside it to make sure they look good and fit in the mold. Then place them near by the mold for quick access.
Active Assembly:
- Wearing latex gloves, mix epoxy resin 1:2 ratio with hardener. This measurement needs to be pretty exact so don’t be sloppy.
- STIR VERY SLOWLY! The faster you mix the more bubbles will be in your resin and it won’t look more like plastic than glass.
- Pour a small amount of resin in the base of whatever molds you will be using.
- Using tweezers gentle place the bees and decorative elements in the pool of resin in each mold.
- Using your stir stick, scoop up a small amount of resin and begin to drip it on top of the bee and flowers. Continue until the bee is submerged.
- Using a small poker or needle stab any bubbles that are present or pull them to the very edges of the piece. This only works on medium sized bubbles. If you have thousands of tiny bubbles it’s because you mixed to quickly and there is not much to be done about it.
- Occasionally the bee will want to spin around and not stay put. In that case set a timer to repeatedly go off every 5 minutes. Check the bee and move it back into place over and over until the resin begins to harden and eventually she will stay put. You must be consistent with this. If the resin is too hard it will be too late to move any of the design elements.
- Leave alone for 24hrs in a cool dry place. RESIN hates moisture so don’t leave it in a humid environment.

Finishing the Piece:
- Pop the hardened resin out of the mold.
- Finish the edges by filing, sawing or buffing down with a dremel.
- If you are pleased with it as is then you can drill a hole through it and hang from a string or chain.
- If you want the surface of the piece to be crystal clear like glass then you must apply a 2nd coat of resin. You can dip the piece in resin and hang to drip dry or lay the piece down on on top of the molds to dry. *If you lay the piece down then resin will pool on the back side and harden that way so it will have to be filed down and fixed so keep that in mind.
- If you have jewelry making skills you can also create a metal bezel to hold the resin piece the same way you would set a cabochon stone.


Troubleshooting:
- If the resin is tacky or wet feeling after a 24hr drying period it is because the ratio wasn’t correct. There is no fixing that issue, you just have to start over.
- If the bee’s body or legs are sticking out of the hardened resin then you can drip some resin into the backside (like you were filling a pool) until it is leveled and leave to dry. You could also file the legs off if the back of the piece won’t be visible.
- If the bee and decorative elements keep floating the the surface you can rig up something to push it down into the resin such as a stick or nail but you have to get creative with this. Also keep in mind if the piece gets stuck to what ever you rig up it could ruin the piece.
Tips for success:
- When dispatching a queen the preferred method is to freeze her, however it is not the fastest way or most humane.
- In general try to use bees that have recently died since their bodies will still be pliable.
- If you can’t use the bee immediately then throw her into a jar and put it in the freezer.
- DON’T SUBMERGE YOUR BEES IN ALCOHOL. The body of a wet bee will pull away from the resin once it has hardened creating an unsightly air bubble.
- If you use flowers make sure they are thoroughly dried. Wet flowers often leach their color once they are submerged into resin.
Leave a comment